Mini Tub a C5
This
document should be used as a General "Guideline" as there are
numerous things that can affect these instructions:
1) The
type of C5 being tubbed (ie.
Coupe, Hardtop, Convertible),
2) The
type of fiberglass being used,
3) The
type resin being used,
4) Tools
needed: - Floorjack - Two Jackstands
- 3" Cutoff wheel Air-Tool or a Dremel Tool with
cutoff wheel or both - 6" sanding wheel Air-Tool, or a sanding block -
Philips screwdriver - Flat-Head screwdriver - Torx 47
(aka. T47) Bit - Pop rivet gun (1/4” bit preferred)
Materials needed: - 60 grit sand paper (for your sander) –
Cutoff
wheels (for your cutting tool) - Resin (Polyester or Epoxy) - Fiberglass mat -
2 oz. Bottle of Gorilla Glue - Pop rivets (1/4” steel rivets preferred) -
Disposable mixing tray (like for painting) - Disposable gloves - Disposable
painters’ jumpsuit (jeans and a long sleeve shirt will do) - Full protection
goggles - Respirator (one that seals REALLY well) –
15 ft.
of plastic covering (like the kind used by painters) - Masking tape - Black
marker (sharpie) –
A
hand full of plastic sandwich baggies - Grey spray paint (glossy, not primer) -
Black spray paint (flat black)
Step
1 Loosen lug nuts on the rear wheels.
Step
2 Raise rear of car and support with jack stands.
Step
3 Remove rear wheels.
Step
4 Remove rear wheel well liners and place screws in a plastic baggie marked
“WHEEL WELL LINERS”. This isn’t necessary but it is helpful when it comes time
to put everything back together.
Step
5 Remove all interior trim from the rear compartment area…….This will differ
slightly between Coupe, FRC, and Vert. Put all screws
and retainers pertaining to each trim piece into its own plastic baggie marked
accordingly.
Step
6 Remove all carpet and padding from the rear compartment area….This will
differ slightly between Coupe, FRC and Vert.
Step
7 Ensure both rear wheel wells are fully exposed in the rear compartment and
underneath with nothing attached or near either of them.

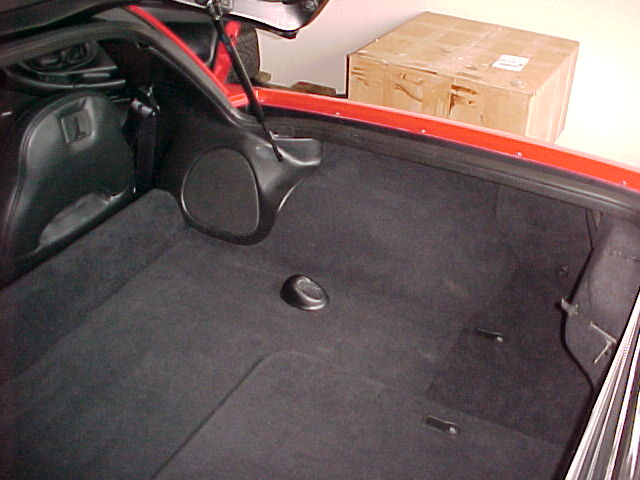
Step 8 Using a
black marker, and picture 1 as a guide (taking note of the areas circled in
green), draw the “proposed” pattern on the fender wells. The main thing here is
to ensure that the “proposed” pattern doesn’t interfere with anything like the
speaker mounting holes, support brackets, body/frame, etc. If there are then
make the necessary adjustment to the pattern.
Once
this “proposed” pattern is checked and verified for clearance then you’re ready
to make the cut. NOTE: The “proposed” pattern should follow the edge of the
wheel well from back to front near the top of the wheel well just after it
transitions from horizontal towards vertical (basically the start of the curved
edge on top).
On
the bottom be sure to go out about an 2” away from the wheel well, avoiding all
obstacles as shown in picture 1, however Do INCLUDE the two top wheel well
liner mounting braces (there are two braces per wheel well) within the
“proposed” pattern.
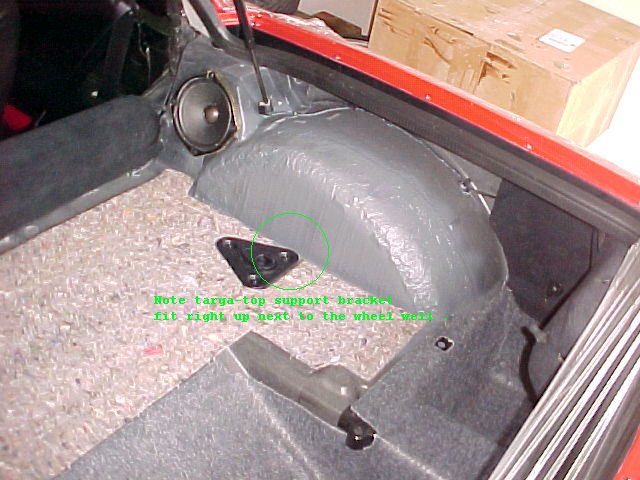
Also
take note of the Targa Top Mounting Bracket location
shown in picture 2, you can cut this off or do like I did and just cut the
fiberglass off it.


Step 9 Using
the plastic drop cloth, cover and seal the interior of the car from the rear
compartment area. If you do not get a good seal then fiberglass dust from
cutting will get inside the interior of the car and will make cleanup harder.
Step
10 Using a cutoff tool or Dremel
tool with cutoff wheel, cut out the rear wheel wells following the pattern drawn.
Step
11 Dry fit the newly cut wheel well panel back into the wheel well to get an
idea of where to mount it. Then mark rear compartment floorboard around the two
wheel well liner mounting braces. Then cut out the two notches to allow
clearance for the wheel well mounting braces.
Step
12 Using a sander, sand the edges of the new cuts (within the rear compartment)
to smooth them out. Then sand the area about 2”-3” away from the cuts and all
points in between. This will allow the resin to stick better since the gelcoat is sanded off. If you are planning on glassing the
underside of the wheel well then repeat Step 10 as necessary for that area.
Step
13 Using a sander or hand-held sander, sand the edges of the piece that was
just cut out. Then sand 2”-3” away and all points in between on the top side.
If you are planning on glassing the underside of the wheel well then repeat
Step 11 as necessary for that area.
Step
14 Once both items are prepped, then clean the areas thoroughly with water or
shop-vac or by hand.
The
main thing here is to make sure the area that the new fiberglass will be mated
to is clean and free from contaminates.
Step
15 Dry fit the new wheels, snug down the lug nuts, and then lower car. This
will give you an idea of how much space is ACTUALLY needed for the new wheels.
Then place the panel that was cut out of the wheel well, back into the wheel
well to get an idea of where to mount the panel.
NOTE:
There should be at least ½” of space between the new wheels and the wheel well
panel. Also make sure the panel is straight and positioned in such a way that
will allow the contour of the wheel well to be maintained (as much as possible
at least).
Once
the desired location is determined mark the area on the rear compartment
floorboard (draw a pattern around the panel base) for future reference.
Step
16 With the wheel well panel still in place, drill
three holes through the panel base and through the rear compartment floorboard.
Pop rivets will eventually go into these holes to hold the panel in place. So
don’t rivet the panel in place just yet.
Step
17 Using a wet paper towel, wet the underside of the
wheel well panel base and the area of the floorboard in which it will be
mounted to (the pattern area drawn in Step 15).
Step
18 Immediately after Step 17, apply a liberal amount of Gorilla Glue to both
mating surfaces (panel & floorboard), and then set panel in place (as
outlined by pattern) aligning pop rivet holes.

Step 19 Once
panel is in place install the three pop rivets. This will aid in applying
pressure to the area that is being glued. See picture 6.
Step 20 Let glue COMPLETELY dry (about 24hrs).
Step
21 In the meantime, precut all fiberglass into 3”x7”
strips (you may want to make a few that are bigger and a few that are smaller
for finishing). Do this prior to mixing the resin. This will aid in reducing
the time needed during glassing since resin will start to harden after about 20
minutes. Plus it’s easier to just grab a precut strip then it is to try an cut one with sticky fingers.
Step
22 Once the glue has completely dried take a piece of cardboard and cut out a strip
about 3” wide and about 8” long and wrap it in sirran
wrap. Take that piece of cardboard and roll it up lengthwise. Now take some
duct tape and tape that piece of sirran wrapped
covered cardboard to the underside of the wheel well covering up the “gap”.
Repeat this for the entire “gap” on both sides of the car. This will act as a
support and a mold for the fiberglass. See pictures 7 and 8.
Step
23 Once the fiberglass has been precut, then you’re
ready for mixing resin. I used Epoxy Resin because it’s a 1:1 mixture ratio,
however Polyester Resin is just as good but requires a little bit more complex
mixing ratio (the container should give proper mixing instructions). So it’s up
to you as to which type you want to use. In either case NOW is the time to mix
it. Be sure only to mix enough resin that you can actually use within a 15-20
minute time frame.


Step 24 Now that the resin is mixed,
take a strip of precut fiberglass and soak it the resin. You’ll see the
fiberglass strip change from “white” to “translucent” as the resin is absorbed
by the fiberglass.
Step
25 Take the soaked strip of fiberglass and very lightly squeegee off any excess
resin.
Step
26 Lay the soaked fiberglass strip across the “gap”
overlapping the wheel well and the wheel well panel by about 2”+ on either
side.
Step
27 Repeat Step 24-26 overlapping the previously laid fiberglass by a 1” or so
until the entire “gap” has been covered on both wheel wells. If some smaller or
bigger pieces of fiberglass are needed then add them as necessary. Mix additional
resin as needed.
Step
28 Let first layer of fiberglass set (about 6 hrs give or take a few).
Step
29 With a hand-held sander lightly rough up the first
layer of fiberglass. This will help the second layer of fiberglass adhere
better to the first layer.
Step
30 Repeat Step 24-28 to add a second layer.
Step
31 I only applied two layers of fiberglass, however if you want to lay three or
more then repeat Step 30. Also as a tip, if you lightly sand the last layer and
mix up a small amount of resin, then spread the resin across the fiberglass
with your hand smoothing it out as you go, it will dry almost as smooth as
glass……makes the finished product look really good.
Step
32 If fiberglassing the
underside of the wheel wells (I didn’t) now is the time to do it.
Sand
the area and then repeat Step 24-28.
Step
33 Once all fiberglassing is done then
CONGRATULTIONS, the hardest parts are over with. Now take the can of gray spray
paint and paint the rear interior wheel wells gray. See picture 9.
Step
34 Paint the underside of the wheel wells black.
Step
35 Allow paint to dry.
Step
36 Reinstall all carpeting and padding. Carpet & pad trimming will vary
depending on how much you tubbed.
Typically
removal of all padding from the sides of the wheel well will be required.
Also
slight carpet trimming around the speaker opening may be needed.
Also
due to the location of the rear speakers on coupes you may have to screw the
very back edge of the speaker trim housing to the newly extended wheel well to
get it to lay flush.
Do
this on
the inside of the mesh speaker cover as this will help hide the screw.
Step
37 Reinstall all trim pieces.
Completed with carpet
installed