Teammate
Al gives his ’88 the floor it deserves
![]()
Last
year we finished our Butlers Cottage Garage we built the previous year.
Carolyn now refers to it as “AL’s Toy Box” (Hum) but something
was missing.
The
floor wasn’t painted. I didn’t think this was going to be a big deal, as I
was going to paint it a Navy Gray. Then
as I looked into painting cement floors, I found out that ALL cement paint or
stain wears off and requires to be repainted every couple of years, and the
choice in colors was very limited. By this time in the project, I was a little
frustrated and looking at using Grey, White and Black tiles on the floor.
The
color choices were OK, but I really wasn’t looking forward to doing a tile
job in the garage. (Little did I know where this was going).
Then
I learned about several 2-part epoxy products out on the market. Sounded
great, but I didn’t like there color options at all. Then I learned about
Rustoleum’s commercial 9100 series 2 part epoxy paint system and they had
ALL the colors that I was looking for: Grey, Black, White and Red (the project
has now expanded considerable).
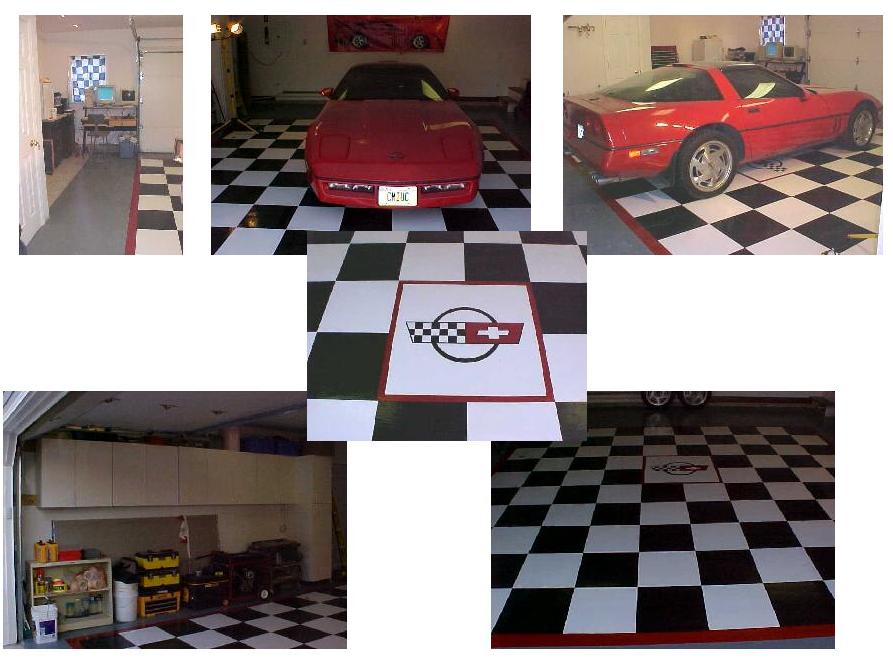
Well,
as time passed, the painted floor grew to a Navy Grey floor, with an 18 x 18
Ft White & Black checkerboard with a 6 inch Red boarder, with a 4 Ft.
Corvette logo in the middle (Hum, wonder if I need GMs approval for that
one??).
It’s
now early December, and the temperature has started to drop. Rustoleum’s
customer service department to the rescue!!
They had a low temperature activator (40-60 degrees).
After
numerous calls to their customer service department I had a battle plan (at
least I thought I did).
I
now needed to determine how much paint I needed?
What
makes this project interesting is there is a time limit before you can put a
second coat on, and a cure time. Should you wish to place a second coat on or
another color on top of the 1st, you must do it before the epoxy
cure – That’s an 18-24 Hrs window depending on Temp.). Otherwise, you have
to use a commercial sander to rough up the surface before applying an
additional coat of epoxy paint.
As
time was a premium, I decided to paint the floor in stages.
But before we talk about painting we can’t forget ALL the prep work
that is required. The cement must be clean, clean, clean.
If
you think it is clean, clean it again…… I used a commercial acid to etch
the cement per Rustoleum’s prep requirements, and used a heavy-duty oil
degreaser on the few oil spots that I did have. It took two of us 6 Hrs to get
the cement etched and cleaned. Now off to HD we go for all the miscellaneous
supplies - rubber gloves, 1 doz. paint rollers, 3 mixing rods, 12 disposable
brushes & mixing containers, 10 rolls of GOOD masking tape, and a
wallpaper roller.
The clock has started ticking – we are on a mission.
I
taped out the 18 ½ Ft x 18 ½ Ft square. All the large stuff in the garage I
didn’t want to move was placed in that area. (Wrong move, was a pain in the
but) and painted the 1st Grey coat. As I was painting up to where
the garage door comes down, I left the door open ~ an inch over night so the
door wouldn’t stick to the floor. (Boy, that was a mistake). In the morning,
the Grey floor looked good, but needed a second coat. However, all the bugs in
the world and a lot of dust and leaves managed to blow in under the door. Have
you ever seen a lady bug that crawled across the paint and left little trails
behind them. Well these little suckers didn’t get too far, but they were
encapsulated in the epoxy paint and were now a bump in the floor. Sooooo, out
came the palm sander and I sanded the entire area – That’s after I cut the
lady bugs out of the epoxy paint. Several hours later I was ready for the
second coat of Grey. The 2nd gray coat went down and it looked
good. The following day it was time to look at doing the checkerboard.
All the junk that was in the middle of the floor could now be placed
along the walls. So up came the old masking tape and down went the tape to
outline Red boarder around the checkerboard. Two coats of Red epoxy and two
days latter it was finished (looks great).
Now
it was time to tackle the actual white & black checkerboard. So up came
the Red masking tape. In an effort to save time, I decided to paint the entire
center section with two coats of white epoxy paint and then overpaint it with
Black epoxy. At this point I had used a chalk line to determine where all the
lines were going to go, but that didn’t work out as they just disappeared if
you walked on them, So off came the chalk lines. I started out with 1-foot
squares. After having taped the entire floor (That’s 4-5 Hrs) and looking at
it from a distance, it looked too busy and didn’t look good at all. So up
came all the masking tape. I then changed to 2 Ft x 2 Ft painted squares.
Another 5 Hrs passed and all the black squares were masked and ready for
paint.
(
It is extremely important to note at this stage in the project that the epoxy
floor be clean,clean,clean at this point in the process, so the masking tape
sticks to the floor (( That’s what the wall paper roller is for)). Otherwise
the Black epoxy paint will migrate under the masking tape. And by the way,
there isn’t any way to remove it once this has happened)
As
I started to paint the black squares, it became readily apparent one could
paint the wrong square very easily. So, I stopped painting, and placed a piece
of black tape in each square that was to be painted black.
The
next two days were uneventful painting the black squares. The checkerboard was
now complete. ( Looking Better!!)
It’s
now mid December and the cement floor is starting to get cold, and the floor
must maintain a temperature between 40-60 degree otherwise the epoxy will not
cure. The gas wasn’t hooked up to the radiant heating system as yet,
however, if I turned on the circulation pumps the floor maintained a
temperature of 45-50 degrees throughout the entire process.
The
next week was spent painting the C4 Corvette logo.
The entire 4 x 4 Ft areas was masked with masking tape, and the circle
of the C4 emblem was cut out and ready for the Black epoxy. Then it was on to
the wings, individual black boxes and then the smaller bow tie emblem (Red
with a ¼ Inch Black boarder). Although this was a small area to paint, it
took a lot of time to mask and cut out each section of the logo.
Now
that it’s finished it looks GREAT!! Better than any car dealer show rooms.
It’s very easy to clean the dust, dirt and oil spills. But do I really want
to part a car on it??
As
for cost to do a garage, there are several commercial companies that will do a
standard 2-car garage with a Beige or Cream color speckle 2-part epoxy for
around $1000.
Or
you can upgrade your garage and spend around
~ $350 for the 2 part epoxy paint,
$30
for the acid and de-greaser, and ~ $150 for lots of masking tape, paint
rollers, brushes, etc
You
bet!! Would I do it again? Yup.
Now
that it’s finished? I’ll be sending Rustoleum’s Customer Service group
pictures of our combined effort. Their normal customers are paint thousands
and thousands of square feet of cement at a time and it’s a single color.
Occasionally one may be painting two colors but there not adjoining colors.
Consequently, they were very interested about the process and the pitfalls of
registration with multiple colors. So,
now that we’ve learned to use our digital camera during this process, I’ll
take another set and send them off to them. This spring or summer I plan on
doing the main garage however, I think we will stick to a single color, most
likely “White”.
Hum,
wonder if there is anything else to do to the garage?
The back wall looks awful blank.